The short answer: most stove top damage comes from 10 avoidable mistakes. In this article, I’d sum it up like this: don’t use rough scrubbers, don’t clean a hot surface, don’t spray into gas parts, don’t soak parts too long, don’t use harsh cleaners, don’t scrape with knives, don’t let spills sit, don’t use too much water, don’t dunk electric coils, and don’t put burners back out of place.
If I want to keep a stove top working and looking good, I need to match the cleaning method to the surface. Glass-ceramic scratches fast. Gas burners can stop lighting if moisture gets into ports or igniters. Electric coils can short out if water reaches the connections. Even a 15–20 minute soak can be enough for some gas parts, while electric coils should be soaked 0 minutes.
Here’s the full list at a glance:
- 1. Using abrasive scrubbers or steel wool on glass or enamel
- 2. Cleaning the stove top while it’s still hot
- 3. Spraying cleaner near gas igniters and burner ports
- 4. Soaking burner caps and grates too long
- 5. Using oven cleaner, bleach, or other harsh chemicals
- 6. Scraping burnt-on food with knives or the wrong metal tools
- 7. Letting grease, sugary spills, and boil-overs sit too long
- 8. Using too much water or reassembling parts while wet
- 9. Submerging electric coils or other electrical parts
- 10. Putting burners back in the wrong position
Bottom line: I’d clean gently, use mild products, and dry every part all the way before putting anything back.
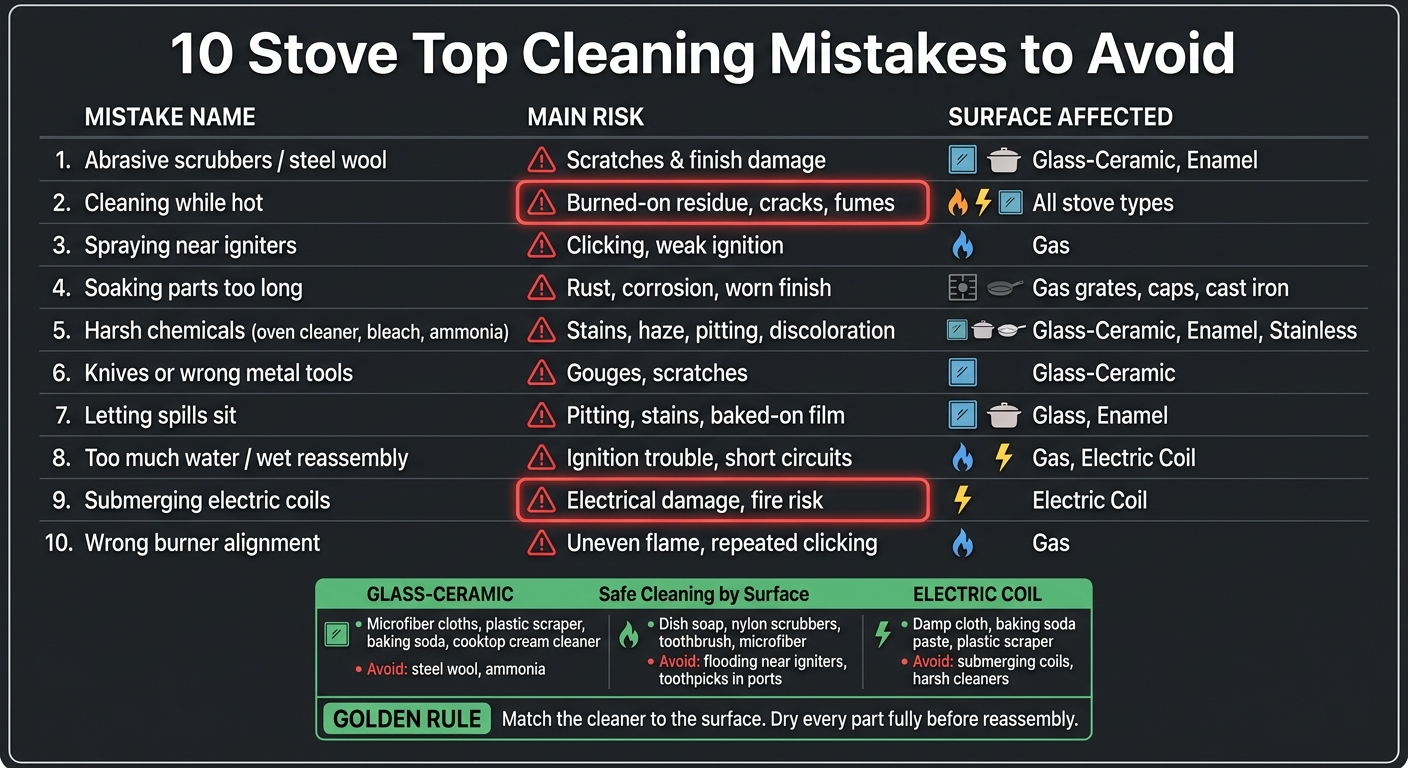
10 Stove Top Cleaning Mistakes: Risks & Surface Types at a Glance
Easy Stove Top Cleaning tips!
sbb-itb-a8bcf38
Quick Comparison
| Mistake | Main risk | Where it matters most |
|---|---|---|
| Abrasive scrubbers | Scratches, finish damage | Glass-ceramic, enamel |
| Cleaning while hot | Burned-on residue, cracks, fumes | All stove types |
| Spraying near igniters | Clicking, weak ignition | Gas |
| Long soaking | Rust, corrosion, worn finish | Gas grates, caps, cast iron |
| Harsh chemicals | Stains, haze, pitting, discoloration | Glass-ceramic, enamel, stainless |
| Knives or wrong metal tools | Gouges, scratches | Glass-ceramic |
| Letting spills sit | Pitting, stains, baked-on film | Glass, enamel |
| Too much water | Ignition trouble, short circuits | Gas, electric coil |
| Submerging coils | Electrical damage, fire risk | Electric coil |
| Wrong burner alignment | Uneven flame, repeated clicking | Gas |
If I follow those basics, stove top cleaning stays simple and a lot less risky.
Why Stove Top Material Matters Before You Clean
Not all stove tops can be cleaned the same way. Glass-ceramic, gas, and electric coil surfaces each need their own approach, and that matters most when you pick your tools and cleaners.
Glass-ceramic tops can scratch, lose their shine, or get etched if you use harsh products. Gas stove tops come with removable grates, burner caps, and burner ports, so you need to handle those parts with care to keep everything working the way it should. Electric coil tops are a different story too: the heating elements should never get wet, and many models lift up so you can clean the drip pan underneath.
Before you start, check the owner’s manual. It usually tells you which cleaners are approved, which parts come off, and how much moisture the stove can handle. For day-to-day cleaning, you’re usually safe with microfiber cloths, soft sponges, mild dish soap, and a cooktop cream cleaner for glass-ceramic surfaces. Baking soda and white vinegar can also do the job without being too harsh. One thing to skip: ammonia-based cleaners on glass-ceramic, since they can leave haze or streaks [6].
Here’s the easiest safe starting point for each surface type:
| Surface Type | Safe Tools & Cleaners | What to Avoid |
|---|---|---|
| Glass-Ceramic | Microfiber cloths, plastic scrapers, baking soda, cooktop cream cleaner | Steel wool, ammonia-based cleaners, abrasive pads |
| Gas (Enamel/SS) | Dish soap, nylon scrubbers, toothbrushes, microfiber cloths | Flooding with water, wire brushes, anything that can break off in burner ports |
| Electric Coil | Damp cloths, dish soap, plastic scrapers | Submerging coils in water, abrasive steel wool on the enameled surface |
Once you know your surface type, the first rule is simple: don’t scrub glass or enamel with abrasive tools.
1. Using Abrasive Scrubbers or Steel Wool on Glass or Enamel
Steel wool and rough scrub pads are a bad match for glass-ceramic and porcelain enamel. They can leave scratches, and those tiny marks tend to hold onto grease and food. Glass-ceramic tops and porcelain enamel finishes are the easiest to damage, and even the rough side of a sponge can mark them [5][6].
Instead of scrubbing harder, use a baking soda paste with a plastic scraper. Spread on the paste, cover it with a warm, damp cloth, and let it sit for 15 to 20 minutes [2]. If a spot still won’t budge, keep the plastic scraper flat and use a low angle to lift the debris without digging into the surface [5].
It also helps to clean the bottoms of your pans. Any grit stuck there can drag across the surface and scratch it [2]. After the surface is clean, let it cool before moving on to the next step.
2. Cleaning the Stove Top While It’s Still Hot
Cleaning a stove top while it’s still hot is a bad idea on any surface. With glass-ceramic, the risk is even higher. Heat can bake residue onto the surface and leave marks that are harder to remove. In some cases, it can also damage the top itself. On gas cooktops, there’s another problem: cleaner can slip into openings where it shouldn’t go.
A hot surface can also release fumes, melt your cleaning tools, or crack glass if the temperature shifts too fast.
Use cleaner only after the surface is cool to the touch.
Some cooktops do make one exception for sugary spills. A scraper may be okay when the surface is warm, not hot. If you do that, wear an oven mitt and hold the scraper at a 45-degree angle [4].
After the cooktop cools, wipe fresh spills with a damp microfiber cloth. That’s even more important on gas cooktops, where poorly aimed spray can clog igniters and burner ports.
3. Spraying Cleaner Directly Near Gas Igniters and Burner Ports
Once the cooktop is cool, keep cleaner away from the ignition system. With a gas cooktop, moisture or leftover residue near the igniter and burner ports can get in the way of ignition.
A wet igniter can lead to repeated clicking. Clogged burner ports can cause weak flames or delayed ignition.
Instead of spraying the surface directly, spray cleaner onto a cloth first, then wipe the cooktop. Use a barely damp cloth on the igniter, and clear blocked ports with a pin or thin wire – not a toothpick.
Dry every part fully before you put anything back together. If the stove still clicks, cut power and let it dry for 24 to 48 hours.
4. Soaking Burner Caps and Grates Too Long
When it comes to removable gas stove parts, a short soak does the job. 15–20 minutes in warm, soapy water is usually enough for burner caps and grates. If the buildup is heavy, you can stretch that to up to 1 hour. Past that point, you’re asking for trouble: rust, corrosion, and worn finishes.
Water affects stove materials in different ways. Cast iron is the riskiest one to soak. It can start rusting fast, even after a brief soak, if the surface isn’t well-seasoned or coated [1][7]. Enamel-coated and stainless steel grates hold up better, but they still need to be dried right away after washing.
"Cast iron burners should never be soaked in water, as this can lead to rust. Instead, use a stiff brush to remove any loose debris." – This Old House [7]
If you’re dealing with unseasoned cast iron, skip the soak altogether. Use a coarse salt paste and a stiff brush instead [7].
After washing, dry every part right away with a towel. Then go over it with a lint-free microfiber cloth to catch any leftover moisture [7][5].
Use this quick guide before soaking any removable part:
| Component | Safe Soak Time | Primary Risk |
|---|---|---|
| Burner caps | 15–20 min | Rust and finish wear [1][7] |
| Cast-iron grates | 15–20 min if well-seasoned | Rapid rust [7][1] |
| Cast-iron burner parts | Do not soak | Internal rust, clogged gas ports [7] |
| Electric coil burners | Never submerge | Electrical short-circuit or permanent damage [1][5] |
5. Using Oven Cleaner, Bleach, or Harsh Chemicals on the Cooktop
Once the stove is dry, the next problem is the cleaner you use. Heavy-duty products may look like a fast fix, but they can damage the cooktop.
Oven cleaner, chlorine bleach, and ammonia-based sprays can harm many cooktop surfaces. On glass-ceramic, they can leave permanent stains, streaks, and tiny pits in the finish. Ammonia can also streak glass and create fumes if the cooktop heats up before the cleaner is fully wiped away. On porcelain enamel, these products can strip the finish and cause discoloration [4][2].
Bleach is also one to avoid. If it touches heated metal surfaces, it can release chlorine gas [8]. And if any cleaner is left behind, it can bake onto the surface and smoke the next time you cook. That’s why it helps to wipe the cooktop clean with a damp cloth after cleaning [3].
The safer move is simple: match the cleaner to the surface, not the mess.
- For glass-ceramic, use a cooktop cleaner made for that surface, white vinegar and water, or a baking soda paste.
- For stainless steel, use mild dish soap and warm water, and wipe with the grain.
- For porcelain enamel, use soft cloths or sponges with soapy water.
Use these cleaners only on a fully cool cooktop.
6. Scraping Burnt-On Food with Knives or the Wrong Metal Tools
After cleaning products, the next thing that can go wrong is the tool you use to lift stuck-on food. It’s easy to grab a kitchen knife when something is baked onto the cooktop. Bad idea. A knife can gouge a glass-ceramic surface fast because its narrow edge puts a lot of pressure on one tiny spot.
Before you scrape anything, soften the mess. Lay a hot, damp microfiber towel over it for 15–30 minutes. If the spot still won’t budge, put on a paste of baking soda and water and let it sit for 20–30 minutes before using any scraper.
When you’re ready to remove the residue, use a plastic scraper. Keep it flat, or at a very shallow angle, and move in one pass. Knives and other metal blades are especially risky on glass-ceramic. On other surfaces, don’t use them unless the manufacturer says it’s okay.
If you do use a metal razor, use it only on glass-ceramic tops. Keep the blade flat so it glides instead of digs in. It also helps to add a little moisture or cooktop cleaner first, so the blade slides across the surface instead of dragging.
Once the residue is gone, the next problem is fresh spills that sit too long.
7. Letting Grease, Sugary Spills, and Boil-Overs Sit Too Long
Once you’ve dealt with burned-on gunk, the next step is simple: don’t let new spills sit there and turn into tomorrow’s mess.
On glass-ceramic cooktops, sugary spills are a big one. As they cool, they can bond to the surface and lead to pitting or permanent damage if you don’t clean them up soon enough. Grease is no picnic either. Reheat it a few times, and it turns into a hard film that sticks like glue. Acidic foods, like tomato sauce, can dull or stain a porcelain enamel finish if they sit too long. And even plain water boil-overs can leave mineral buildup behind. Once that dries and gets heated again, it becomes much tougher to remove.
The fix is pretty straightforward. Wipe spills after the surface is cool to the touch. For light messes, use a damp microfiber cloth. For greasy spots, add a drop of dish soap. If the stove is still hot, blot the spill first and come back to clean it once the surface cools down.
It also helps to check the bottoms of your pots and pans before cooking. If a skillet has grease stuck underneath, that residue can bake right onto the cooktop.
| Spill Type | What Happens If You Wait | Surface Risk |
|---|---|---|
| Sugary liquids | Fuses to the surface as it cools | Pitting or permanent damage on glass/ceramic |
| Grease/oils | Bakes into a hard, baked-on film | Requires aggressive scrubbing that can scratch the surface |
| Acidic foods | Chemically reacts with the finish | Permanent staining or etching on porcelain |
| Boil-overs | Leaves concentrated mineral deposits | Cloudiness and stubborn white spots |
8. Using Too Much Water or Putting Parts Back Before They’re Dry
Once you’ve wiped up a spill, stop there. Don’t soak the cooktop or put parts back too soon. Extra water can slip into burner ports, igniters, and the electrical parts under the surface. That can lead to ignition problems or even short circuits.
The right drying step depends on the kind of stove you have. For gas stoves, dry grates and burner caps with a towel right after washing, then wipe the cooktop with a microfiber cloth. For electric coil stoves, never put the coils in water. Wipe them with a damp cloth and let them air-dry for 30 to 60 minutes before reconnecting them [1][10]. For glass-ceramic tops, use a dry microfiber cloth to buff the surface dry so you don’t end up with water spots or streaks [5][2].
If a gas burner keeps clicking, give it more time to dry before turning it back on.
| Stove Component | Drying Method | Risk If Still Wet |
|---|---|---|
| Gas burner caps/grates | Towel dry immediately | Rust and ignition delay |
| Gas burner ports | Let dry completely | Weak or uneven flame |
| Electric coils | Wipe with a damp cloth and let connection points dry fully before reconnecting them | Short circuit or electrical damage |
| Glass-ceramic surface | Buff dry with a dry microfiber cloth | Water spots and streaks |
9. Submerging Electric Coils or Other Electrical Components
With electric coil stoves, the main danger is simple: water and electrical parts don’t mix.
If water gets into the coil or the connection points, the burner can short out. It can also damage the stove or create a fire risk. The metal prongs and the stove sockets are the most exposed parts, so never submerge electric coils in water.
A safer way to clean them is to burn off residue first. Turn the burner on high for 2–3 minutes, then let it cool all the way down. After that, wipe the coil with a barely damp sponge and warm, soapy water. If a spot won’t come off, put a little baking soda on the damp sponge and scrub gently.
Make sure the prongs and stove sockets are completely dry before you reconnect anything. Once the coil is back in place, turn the burner on low for a short time to dry any leftover moisture.
Also, keep the drip pans separate from the coils. Clean each part on its own. You can soak removable drip pans in hot, soapy water for 15–60 minutes.
10. Putting Burners Back in the Wrong Position or Out of Alignment
Once the parts are clean and dry, you need to put them back exactly right. This is where people often rush. A burner cap or head can look fine at a glance, but even a small shift can lead to repeated clicking, weak ignition, or a flame that burns unevenly.
The burner head helps control flame shape and gas flow. Set the burner head down flat first, then place the cap in the center on top. Before you light the burner, check that the head sits flat and doesn’t wobble. The order matters here: burner head first, cap second.
After that, test each burner for a moment. If the flame looks uneven or the burner keeps clicking, turn it off right away and check the cap and head again. If it still doesn’t work right after reassembly, look at the port openings and clear any blockage with a safety pin or thin needle – never a toothpick, which can snap off and cause a permanent blockage [1].
Your owner’s manual can also help here. Some stove models have alignment notches or pins that guide the burner parts into the right spot. If your stove uses them, make sure each piece is fully seated in those guides before lighting anything [4].
Stove Top Care at a Glance: What’s Safe by Surface Type
After the mistakes above, use this chart for a fast, surface-by-surface check.
| Surface Type | Safe Tools & Cleaners | What to Avoid | Key Warning |
|---|---|---|---|
| Glass-Ceramic | Microfiber cloths, plastic scraper or cooktop razor used low and flat, baking soda, vinegar, specialized cooktop cleaner | Steel wool, abrasive sponges, ammonia-based cleaners, paper towels | Never clean while the surface is still hot – cleaners can burn onto the glass and cause permanent damage or pitting [5][11] |
| Gas | Degreasing dish soap, nylon scrubbers, soft brushes, microfiber cloths, a pin for burner ports, vinegar | Steel wool, wire brushes, toothpicks in ports, flooding near igniters | Burner caps must be completely dry and properly aligned before lighting – moisture or misalignment can prevent ignition [1][4] |
| Electric Coil | Damp cloths for coils, soapy water for drip pans, baking soda paste, plastic scrapers, nylon brushes | Submerging coils in water, dishwasher, harsh cleaners on heating elements | Water in the electrical connection points can cause a short circuit or permanent damage – parts must be bone-dry before reattaching [1][5] |
Match the cleaner to the surface, and day-to-day upkeep gets a lot easier. That way, grease, splatters, and cooked-on messes don’t pile up so fast.
Simple Habits That Keep Your Stove Top Cleaner Longer
The best way to avoid tough stove top messes is to stop them before they have time to bake on. A few small habits can make a big difference here.
Wipe up spills as soon as the cooktop is cool to the touch. Sugary and acidic messes need extra attention, because they can bond to glass-ceramic or etch porcelain.
A couple of simple habits also help keep buildup in check: clean the bottoms of your pots and pans before putting them on the burner, and use a spoon rest instead of setting dirty utensils right on the cooktop. If you’re moving heavy pans, especially cast iron, lift them instead of sliding them. That helps prevent scratches that can trap grease [6].
If spills still keep baking on even with daily cleanup, move on to a deeper clean.
When to Call in a Professional for Kitchen Deep Cleaning
At a certain point, this stops being a cleaning job and turns into a repair job. Good day-to-day care helps a lot, but some stove top problems just won’t budge with a sponge and baking soda. That’s the moment to stop scrubbing and bring in a technician.
If the surface is damaged or the appliance still acts up after cleaning, don’t push it. Call a pro if you see deep scratches or chips on a glass surface, stains that won’t come off with normal cleaning, or electrical issues or failing heating elements [2].
The same goes for burners that still click after drying and putting everything back together, or a heating element that heats unevenly. In those cases, more scrubbing can make things worse, so it’s smarter to call a repair technician [1][2].
For thick buildup on grates or drip pans, a professional deep-cleaning service is often the better move [5]. And if harsh chemicals have already etched or stained the finish, you may need professional help for that too [6][9].
Conclusion
Most stove top damage comes down to three things: using the wrong tool, picking the wrong cleaner, or putting parts back while they’re still wet.
The good news is that the fix is pretty simple. Use the right cleaning method for your stove surface, and the most common problems – scratches, ignition issues, and finish wear – become much easier to avoid.
Check the owner’s manual for approved cleaners and care steps. Use a cooktop cleaner made for your exact surface type. Then dry every part all the way before reassembly.
Clean gently. Dry everything fully. That small bit of care helps your stove top stay safer and look good for longer.
FAQs
How do I know what type of stove top I have?
You can usually figure it out just by looking at the surface and the main parts.
A gas stove top usually has metal grates and removable burners. An electric stove top may have visible heating coils or a smooth glass or ceramic surface.
If the top is solid and flat with a glass or ceramic finish, it’s either an induction stove or a flat-top electric stove. If you want the exact model details, check the manufacturer’s user manual or look up the model number online.
What cleaner is safest for my stove top?
For most stovetops, the safest cleaner is warm water and mild dish soap. It’s a simple go-to, and it works well on glass, ceramic, enamel, and stainless steel.
If you’re dealing with tougher spots, try a paste made from baking soda and water, or mix equal parts white vinegar and water. Going with a store-bought cleaner instead? Choose one made for your stove type, and check your owner’s manual first.
When should I call a repair technician?
Call a repair technician if your stovetop has electrical problems or burners that aren’t heating the way they should.
It’s also smart to bring in a pro for deep scratches or chips in the glass that cleaning at home can’t fix. The same goes for discoloration that still won’t come off after you’ve cleaned the surface the right way.