Pet stains get much harder to clean if you wait. In many cases, a wet stain is about 10x easier to remove than a dried one, so I’d treat it right away and use the method that fits the surface.
Here’s the short version: blot first, use cool water, apply an enzyme cleaner, dry the area fast, and check again after 24–48 hours. I’d also handle carpet, upholstery, tile, laminate, and hardwood with different care, since too much moisture can lead to rings, odor, or floor damage.
What this checklist covers:
- How I’d treat wet stains
- How I’d treat older dried stains
- Which tools and cleaners to use
- How I’d test surfaces before cleaning
- What signs point to padding or subfloor problems
- When it makes sense to call for help in Nassau County
This is a plain-language guide to help you remove the stain, cut the odor at the source, and avoid making the spot worse.
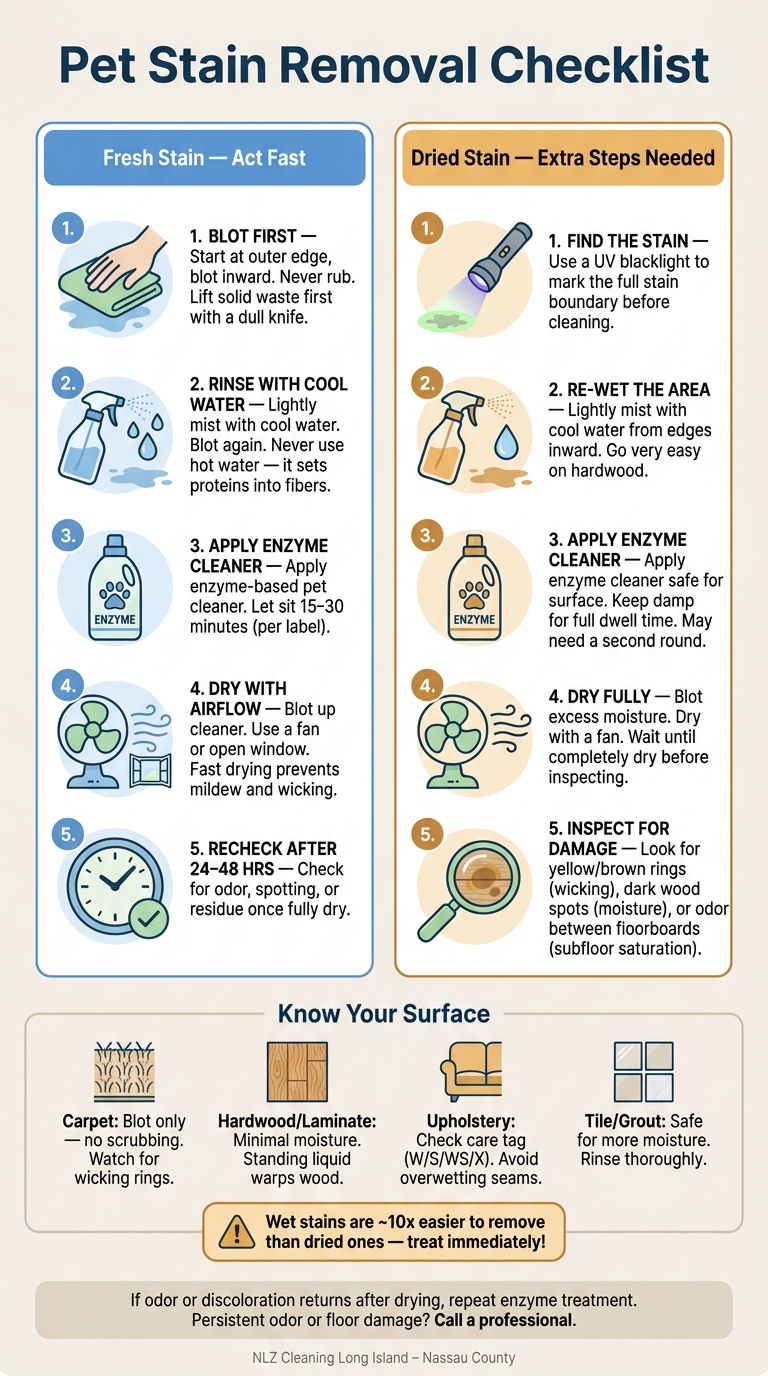
Pet Stain Removal Checklist: Step-by-Step Guide for Every Surface
How to Remove Any Pet Stain In Two Steps or Less – Urine, Feces, Vomit
sbb-itb-a8bcf38
Fresh Pet Stain Checklist
Start at the outer edge and blot inward.
Blot First, Work From the Outside In
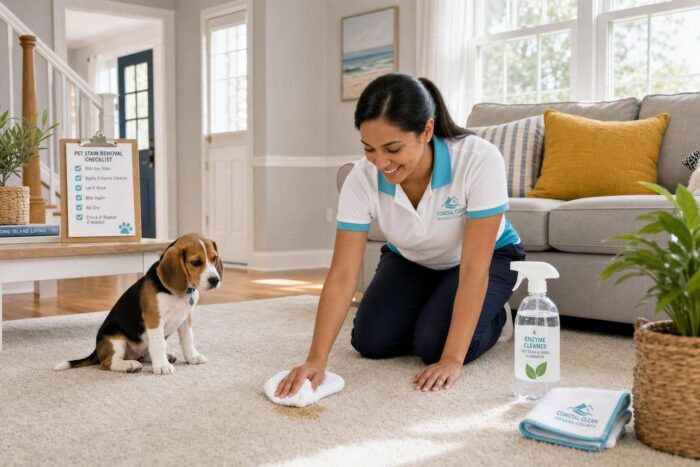
Begin at the outside edge of the stain and blot toward the center with a clean white cloth or paper towels. Press down firmly, lift, move to a dry part of the cloth, and repeat. Blot – don’t rub. Rubbing can push the liquid deeper into the carpet fibers and make the stain spread [1][2]. If there’s solid waste, lift it off first with a dull knife or spatula before you blot [5].
Rinse With Cool Water, Then Blot Again
Once you’ve soaked up the extra liquid, lightly mist the area with cool water to dilute what’s left, then blot again until almost no moisture transfers. Don’t pour water straight onto the stain. Too much water can sink into the padding or subfloor [1][2].
Never use hot water on a fresh pet stain. Heat can set the proteins and acids into the fibers, which makes the stain harder to remove [1][2].
Apply Enzyme Cleaner, Dry With Airflow, and Recheck
After blotting and rinsing, apply an enzyme-based cleaner made for pet stains. Let it sit for the dwell time listed on the label, which is usually 15 to 30 minutes [2][3]. Then blot up the extra cleaner and use a fan or open a nearby window to help the area dry [1][2]. Fast drying helps limit mildew and wicking.
When the area is fully dry, check for odor, spotting, or residue.
If the stain has already dried or the odor is still there after drying, move to the old-stain checklist.
Old Pet Stain Checklist
Dried stains are tougher to deal with because the residue can sink into carpet fibers, padding, and even the subfloor.
Re-Wet the Area Before Treatment
If the stain has already dried, begin by loosening the residue. Lightly mist the area with cool water, working from the edges toward the center [1]. On hardwood floors, go easy – a very light mist is enough. Too much moisture can warp the wood or force liquid between the planks [1].
Use a UV blacklight to mark the full stain before you clean [3].
Use Enzyme Cleaner With Enough Dwell Time
Once the area is slightly damp, apply an enzyme cleaner made for pet stains and safe for that surface. Stick to the amount listed on the label. Don’t soak the area.
For deep odors, keep the spot damp for the full dwell time listed on the product label [1]. Older stains may need a second round. If the odor is still there after the area dries all the way, treat it again [3].
Dry Fully, Then Inspect for Damage
Blot up extra moisture, dry the area with a fan, and wait until it is fully dry before you inspect it [2].
Check for yellow or brown rings. Those usually mean moisture wicked up from the padding. On hardwood, dark discoloration can mean the finish was penetrated. If you smell odor coming from between floorboards, the subfloor may be saturated.
If odor is still present after drying, choose a cleaner that matches the surface before repeating treatment.
Product and Tool Choices
Once you know if the stain is fresh or set, the next step is simple: pick the right cleaner and the right tools for the surface you’re dealing with.
Basic Supplies to Keep on Hand
You don’t need a huge kit for most pet stains. A few basic items usually do the job:
- Plain white cloths or paper towels
- Disposable gloves
- A spray bottle filled with cool water
- A fan
For fabric, use an upholstery vacuum attachment. For carpet, a wet/dry vacuum can pull out moisture before it sinks into the padding. And for solid messes, use a dull knife or spatula to lift material off the surface without grinding it deeper into the fibers.
Choose Cleaners That Are Safe for the Surface
For urine, vomit, and feces, use an enzyme cleaner.
If you’re cleaning washable fabric, check the care tag first. Look for W, S, WS, or X. That small label can save you a lot of trouble. Also, test any cleaner on a hidden area before putting it on the stain.
If you’re thinking about using 3% hydrogen peroxide, test it on a hidden spot first. It can bleach fabric.
After you pick a cleaner, make sure it fits the fabric or floor before you apply it.
When to Call for Cleaning Help in Nassau County
Some stains are more than a quick cleanup problem. If the same spot keeps getting accidents, if the stain covers a big area, or if the odor keeps coming back after cleaning, call NLZ Cleaning Long Island for recurring stains, large affected areas, or odor that returns after cleaning.
If odor, staining, or floor damage remains, move to the safety checks.
Fabric, Carpet, and Floor Safety Checks
Before you put any cleaner on a surface, check how that surface reacts first. A quick test can save you from turning a small stain into a much bigger mess.
Test Products in a Hidden Spot First
Start with a hidden area, like an inside seam, under a cushion, or a rug corner tucked under furniture. Put a small amount on a white cloth, dab the spot, and look for color transfer, fading, or any change in texture.
This matters most with delicate materials. Silk, viscose, and other delicate rugs can discolor, shrink, or brown, so test them first. Berber carpet needs care too. Its looped fibers can snag if you scrub instead of blotting. [1]
If the test spot reacts badly, stop there and switch to a different product before you touch the stain.
Avoid Overwetting Padding, Seams, and Wood
Too much liquid often does more harm than the stain itself. Once moisture starts moving below the surface, problems can spread fast.
On upholstery, liquid tends to collect in seams, so check upholstery labels before applying cleaner. [1]
Hardwood calls for the most care. Even a small amount of standing liquid can make the wood swell or darken. And if liquid slips between the planks, it may reach the subfloor too. [1]
Stop if the Surface Starts to Change
Pay attention while you clean, not just after. The moment the surface starts to change, stop.
Watch for signs like:
- Color transfer
- Finish clouding
- Soft wood
- Bubbling
- Fabric distortion [2]
Follow-Up Checks for Odor and Damage
After blotting, enzyme treatment, and full drying, do one more pass. This is where you catch the stuff surface cleaning can miss.
Check for Lingering Odor and Residue
Check the area again in a warm, humid room. That’s when odor is most likely to come back. [1][3][5]
Touch the dry spot too. If the fibers feel stiff or sticky, there may still be residue there, or cleaner left behind. [2]
A UV blacklight can help you spot hidden urine residue that you can’t see in normal light. [3][4]
If the area still seems off, look next for color changes or damage underneath.
Look for Discoloration and Floor Problems
These signs can tell you if the stain is gone, or if it’s still working its way up from below:
- Carpet: yellow or brown ring coming back – wicking from padding or subfloor [2][5]
- Carpet: stiff or sticky fibers – cleaner residue [2][1]
- Hardwood/Laminate: cloudy, white, or dark spots – moisture damage [2][1]
- Upholstery: texture change or browning – moisture damage or the wrong cleaner [1][5]
Check again 24–48 hours after the area looks dry. If the stain shows up again during that time, liquid is still moving up from the padding below. In that case, cleaning the surface alone may not fix it. [2]
Conclusion: Repeat Treatment if Odor or Discoloration Returns
If odor or discoloration comes back after drying, repeat a light enzyme treatment. If the smell still returns on humid days, or you notice soft spots or warped boards, the urine may have reached the padding or subfloor. That’s the point to call a professional. [1][3][5]
FAQs
How do I know if urine reached the padding or subfloor?
Signs it reached the padding or subfloor include odor that sticks around after surface cleaning, smell that comes back in humid weather, a spongy or warped patch, or discoloration on baseboards.
A blacklight may show hidden residue, and moisture meters can detect moisture deeper down. If your pet keeps going back to the same spot, that can point to contamination below the surface.
What should I do if the stain or odor comes back after drying?
If a pet stain smell comes back after the carpet dries, that’s usually a sign the mess soaked past the carpet fibers and into the padding or even the subfloor. And that’s where a lot of at-home cleaning jobs fall short.
Try reapplying an enzymatic cleaner and use enough so it soaks deep into the affected spot. You can cover the area with plastic wrap for 24 to 48 hours to help it keep working instead of drying out too soon.
You can also use baking soda to help pull in leftover odor.
If the smell still sticks around after that, professional deep extraction is the next step.
Which pet stain cleaner is safest for carpet, upholstery, or wood?
For carpet, upholstery, and wood, the safest pick is an enzyme-based pet stain and odor cleaner. Instead of covering the smell with fragrance, it breaks down the proteins in pet waste at the source.
Follow the product directions closely, then let the area dry all the way. That part matters a lot for carpet padding and wood, where urine can soak deep into the material and lead to discoloration or warping. With wood, skip harsh cleaners and stick to mild, targeted spot cleaning.