Dust does not stay on surfaces. It keeps moving. In many homes, rugs can hold 10 to 50 times more dust than hard floors, and fine particles can stay in the air for hours. If I want less dust floating around, I need to clean the places that store it and use tools that remove it instead of blowing it back out.
Here’s the short version:
- Vacuum carpets and rugs with a sealed HEPA vacuum
- Damp-dust hard surfaces with microfiber
- Wash bedding weekly in hot water at 130°F+
- Vacuum upholstery and curtains
- Clean vents and grilles
- Wipe ceiling fans and light fixtures
- Damp-mop hard floors instead of dry sweeping
- Wipe baseboards, trim, and corners
- Cut clutter and wash dusty textiles
A few jobs do most of the work: HEPA vacuuming, hot-water laundry, damp dusting, and damp-mopping. Dry dusters and dry brooms often just move dust around. If I keep up with the high-dust spots each week, I can lower what gets stirred into the air.
Dust Proof Your Home – 10 Easy Hacks! (seriously simple dust free home hacks)
sbb-itb-a8bcf38
Quick Comparison
| Task | Main Goal | Best Tool | How Often |
|---|---|---|---|
| Vacuum carpets/rugs | Pull dust from fibers | Sealed HEPA vacuum | 1–2x per week |
| Damp-dust surfaces | Lift settled dust | Damp microfiber cloth | Weekly |
| Wash bedding | Cut dust mites and skin flakes | Hot water, 130°F+ | Weekly |
| Clean upholstery/curtains | Remove dust from fabrics | HEPA vacuum, upholstery tool | Weekly to monthly |
| Clean vents/grilles | Stop dust from blowing out | Vacuum brush, damp cloth | Every 3–6 months |
| Clean fans/lights | Keep dust from spreading overhead | Pillowcase, microfiber cloth | Weekly to monthly |
| Damp-mop floors | Pick up leftover fine dust | Damp microfiber mop | Weekly |
| Clean baseboards/trim | Remove edge buildup | Damp cloth, crevice tool | Every 2 weeks to monthly |
| Reduce clutter/textiles | Lower dust-holding surfaces | Sealed bins, routine washing | Ongoing |
If I had to keep it simple, I’d start with the floors, bedding, vents, and fabrics first. That’s where a lot of dust sits before it ends up back in the air.
Why Dust Becomes Airborne Indoors
Dust doesn’t just sit still. It settles into carpets, bedding, upholstery, curtains, and along edges like baseboards and door frames. Then normal daily activity puts it right back into the air.
Soft surfaces hold the most dust. Carpets and rugs can trap 10–50 times more dust than hard floors [2]. And once that dust is sitting there, foot traffic and everyday use can send it airborne again. HVAC systems can also move fine dust through return grilles and vents [1][5]. Ceiling fans add to the problem too. Their blades collect thick layers over time, and when you switch the fan on, those particles spread across the room [1][3].
Dry cleaning methods can make things worse. Feather dusters and dry brooms often just push dust around instead of taking it away [2][1].
That’s why the next tasks focus on removing dust at the source, not just moving it from one spot to another. Start with the surfaces that hold the most dust.
1. Vacuum Carpets and Rugs With a HEPA Filter
Carpets and rugs are some of the biggest dust traps in a home. In fact, they can hold 10 to 50 times more dust than hard floors [2]. And every time you walk across them, some of that dust can get pushed back into the air.
That’s why the vacuum itself matters just as much as how often you clean. A standard vacuum might pick up the stuff you can see, but it can also blow fine dust back into the room through its exhaust ports [2][1]. A True HEPA or H13 vacuum with a sealed system is built to trap 99.97% of particles as small as 0.3 microns [2][3].
For day-to-day cleaning, vacuum high-traffic areas at least twice a week and low-traffic rooms and rugs once a week [2][3]. If you have pets, do it more than twice a week, especially near the spots where they like to nap or hang out [9][5].
How you vacuum makes a big difference too. Move the machine slowly and overlap each pass by about 50% of the vacuum head’s width [1]. Fast back-and-forth strokes may feel productive, but they don’t do as much to pull dust from deep inside carpet fibers [1][3].
A few small habits help here:
- Empty the dirt cup or replace the bag after every use to help keep suction steady and cut dust leakage [3].
- Vacuum last in your cleaning routine, after dusting shelves, furniture, and other higher surfaces, so you pick up what falls to the floor [1][3].
2. Damp-Dust Hard Surfaces With Microfiber
Hard surfaces like shelves, TV stands, window sills, door frames, and tall furniture pick up dust fast. And once that dust settles, it doesn’t just stay put. It gets knocked back into the air every time you walk by, open a door, or move something around. Electronics tend to get even dirtier because static and heat pull dust in.
That’s why a damp microfiber cloth works so well. Instead of pushing dust around, it lifts it off the surface.
Microfiber’s dense weave captures fine dust better than cotton [2][4].
Keep the cloth just damp, not wet. Wring it out well before you start. For high-use spots like tables and TV stands, clean once a week. If you have pets or anyone in the home deals with allergies, bump that up to twice a week [1][2][6].
For electronics, unplug them first. Then wipe them down with a just-damp microfiber cloth to cut static and remove buildup [1]. As you clean, rinse and re-dampen the cloth often so you’re not putting dust right back where you started [2].
After hard surfaces, move to fabrics that trap dust deep in their fibers.
3. Wash Bedding and Linens in Hot Water
Bedding picks up dust, dead skin cells, and dust-mite waste. Then, every time you get into bed, some of that gets stirred back into the air. That’s why washing sheets and other bed linens every week should be high on the list.
Wash bedding weekly in hot water when the care label allows. Use water at 130°F (54°C) or hotter to kill dust mites. Warm or cold water can wash away surface dust, but mites stay alive and keep reproducing [2].
A couple of steps make a big difference:
- Use allergen-proof encasements on mattresses and pillows. They act as a physical barrier and help stop mites from settling into the bed [2].
- When you strip the bed, vacuum the mattress with an upholstery attachment [1].
After the bed, move on to other fabric surfaces that trap dust and send it back into the air when used.
4. Clean Curtains, Upholstery, and Soft Furnishings
After bedding, turn to the other fabrics in your home. Curtains, upholstery, pillows, and lampshades pull in dust all day, then send it back into the air when you move them.
Sofas and chairs need regular care. Each time someone sits down, it can push trapped dust, skin cells, and pet dander back into the breathing zone. Vacuum upholstered furniture once or twice a week with a HEPA vacuum and an upholstery attachment.
Curtains don’t need as much attention, but they still count. Vacuum them once a month. Wash or dry-clean them every 2 to 6 months.
Wash throw pillows and blankets monthly. For fabric lampshades, use a vacuum with a soft brush attachment or wipe them with a microfiber cloth.
Skip dry cloths and feather dusters. Use vacuuming or a damp microfiber cloth instead.
Next, clean vents and grilles so they stop circulating settled dust.
5. Dust and Wash Vents, Registers, and Grilles
Next, clean vents and grilles. They often hold settled dust, then blow it right back into the room every time the HVAC system kicks on.
Start by turning off the HVAC system. That keeps loosened dust from getting pulled into the ductwork or pushed into the air. Then vacuum the slats with a HEPA vacuum and a soft brush attachment. After that, wipe them with a damp microfiber cloth to pick up whatever the vacuum missed.
For a deeper clean every 3 to 6 months [6], remove the vent covers and wash them in warm, soapy water. That helps clear buildup that a vacuum alone can’t reach. While the cover is off, vacuum just inside the duct opening too.
Don’t skip the wall and trim around each vent. Airflow often leaves a dusty ring there, and it’s easy to miss. In most homes, regular wiping does the job. But if you have pets, renovation dust, or lots of foot traffic, you’ll likely need to clean them more often.
Once the vents are clean, move to ceiling fans and light fixtures.
6. Clean Ceiling Fans and Light Fixtures
Next, clean ceiling fans and light fixtures. They can send dust right back into the room, so handle them before you dust other surfaces. That way, anything that falls from the blades or shades lands on areas you haven’t cleaned yet.
Ceiling fan blades tend to hold dust on top, and that dust spreads every time the fan runs.
A simple trick: slide an old pillowcase over each blade, then pull it back slowly to trap the dust inside. For globes and shades, wipe them with a damp microfiber cloth. If you run into small corners or tight crevices, use a soft brush.
Wipe them weekly, and do a deeper clean every month – or every 2 to 3 months in homes with pets or allergies [6]. Turn off the fan and HVAC before cleaning so dust doesn’t keep moving through the air [5].
7. Damp-Mop Hard Floors Instead of Dry Sweeping
After you vacuum rugs and dust hard surfaces, hard floors still need a wet pass to pick up what’s left behind. They don’t hang onto dust the way carpet does, but loose dust on the surface gets kicked up fast. That’s why dry sweeping often makes the mess move around instead of removing it.
Use a microfiber mop head that’s lightly dampened with water or cleaner. That helps trap dust instead of pushing it across the floor. Go easy on the moisture, though. If the mop is too wet, it won’t pick up as well and can leave streaks [3][10].
Start by vacuuming with a HEPA-filter vacuum. Then mop. If you skip that first step, loose debris can turn into streaky grime once it gets wet [10].
A simple routine works well:
- Damp-mop entryways twice a week
- Damp-mop other hard floors once a week
- Rinse and re-dampen the mop head often during each pass so you’re lifting dust, not spreading it around [2][8]
Once the floor is clean, the edges, corners, and trim need attention next.
8. Clean Baseboards, Corners, and Trim
After the floors, move to the edges where dust likes to pile up. Baseboards and corners are some of the biggest dust traps in any room [5]. Dust also settles along room edges, where airflow is weakest. And once it’s sitting there, foot traffic or vacuuming can stir it up and send it right back into the air you breathe [3].
Use a damp wipe, not a dry duster. A barely damp microfiber cloth grabs particles on contact instead of pushing them around. For grooves and tight corners, use a crevice tool or a small detail brush [5][8].
It also helps to clean trim before your final vacuum pass on the floor. That way, any dust that drops gets picked up right away. Then finish with one last vacuum pass to remove anything you loosened.
For most homes, a light wipe every two weeks is enough to keep buildup in check [3]. If you have pets or lots of foot traffic, weekly cleaning in entryways and busy rooms works better [5][8]. Door and window frames usually only need attention once a month [1].
Once the edges are clean, the next step is cutting back on clutter and extra fabrics that keep sending dust back into the room.
9. Reduce Clutter and Maintain Textiles
After the edges and vents, the last big dust magnets are clutter and soft materials. Open shelves, stacks of paper, decor, and tangled cable bundles all collect dust, then send it back into the air when you move them [2][1]. Electronics add to the problem because static charges pull particles toward them [1].
The fix is simple: use smarter storage. Put items you rarely use in sealed bins or glass-front cabinets. Store off-season clothes in sealed bags instead of leaving them on open closet shelves [1][2]. When fewer surfaces are exposed, less dust settles there – and less dust gets kicked up later.
Textiles need steady care too. Wash throw blankets and decorative pillows once a month. Wash pet beds every week. Vacuum fabric storage bins monthly [9][6].
Next, compare which tasks make the biggest difference.
Comparison Table: Which Tasks Make the Biggest Difference?
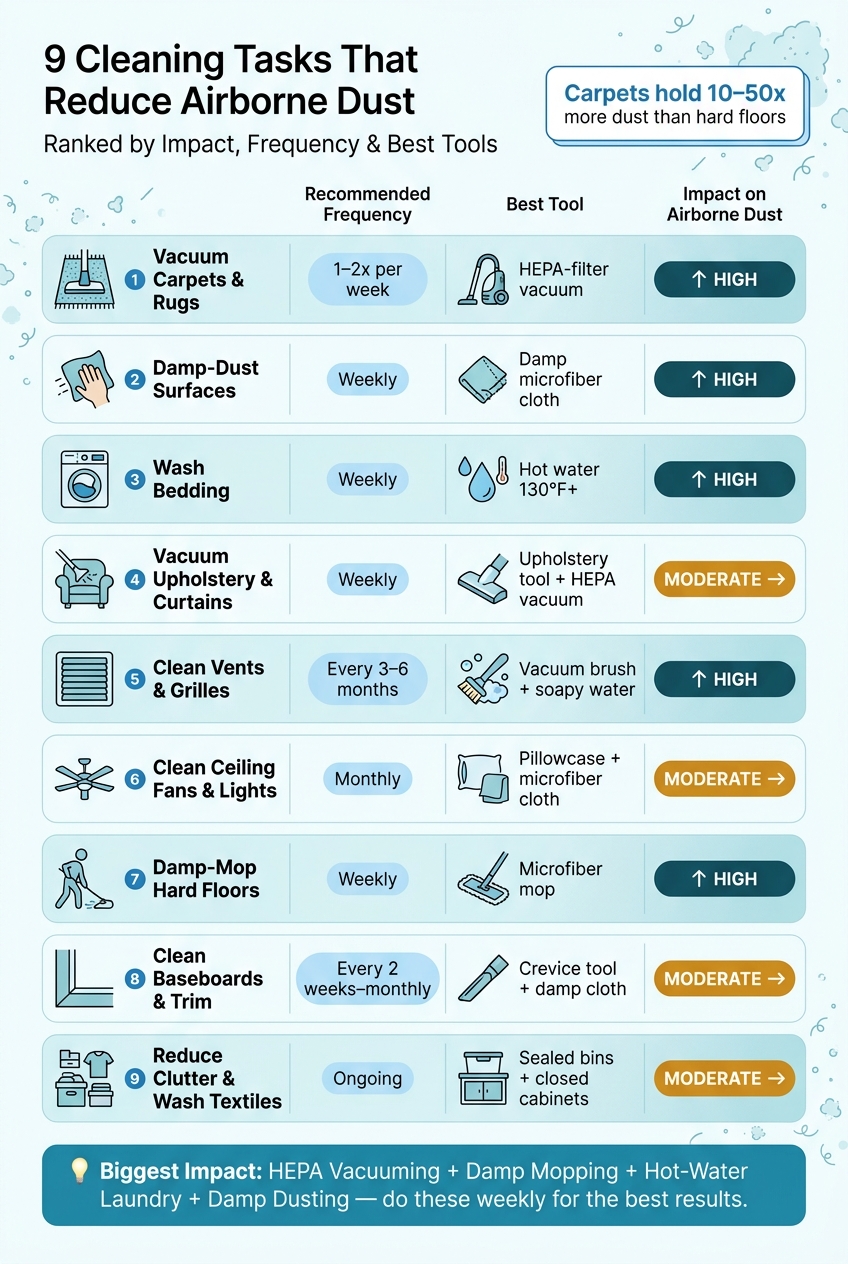
9 Cleaning Tasks That Reduce Airborne Dust: Frequency, Tools & Impact
Not every cleaning job moves the needle in the same way. If your goal is to cut down airborne dust, start with the tasks that do the most work first. This table ranks all nine by impact and frequency.
| Cleaning Task | Recommended Frequency | Best Tools/Products | Impact on Airborne Dust |
|---|---|---|---|
| 1. Vacuum Carpets/Rugs | 1–2 times per week | HEPA-filter vacuum | High |
| 2. Damp-Dust Surfaces | Weekly | Damp microfiber cloth | High |
| 3. Wash Bedding | Weekly | Hot water (130°F+) [2] | High |
| 4. Vacuum Upholstery | Weekly | Upholstery tool, HEPA vacuum | Moderate |
| 5. Dust/Wash Vents | Monthly | Vacuum brush, soapy water | High |
| 6. Clean Ceiling Fans | Monthly | Pillowcase, extendable duster | Moderate |
| 7. Damp-Mop Floors | Weekly | Microfiber mop | High |
| 8. Clean Baseboards | Monthly | Crevice tool, damp cloth | Moderate |
| 9. Reduce Open-Surface Clutter | Ongoing | Sealed bins, closed cabinets | Moderate |
Vacuuming and damp-mopping do the most heavy lifting. Dust lands on floors first. Then people walk through the room, and that dust gets kicked back into the air. A HEPA vacuum plus a damp microfiber mop stops that loop where it starts.
If dust keeps coming back even after you stay on top of these jobs, routine cleaning may not be enough. At that point, it helps to look at whether the space needs deeper cleaning.
When to Call a Professional for Deep Cleaning
If dust keeps showing up soon after you clean, you’re probably dealing with more than basic upkeep. At that point, it makes sense to bring in a professional. This is especially true when the dust is very fine, spread all over the home, or keeps coming back no matter how often you tidy up.
Post-renovation drywall and plaster dust are a common example. That kind of dust can hang in the air and push past normal cleaning routines. It’s often too fine for standard vacuums to catch [7].
Move-in and move-out cleanings also go after spots people often miss during day-to-day cleaning, like vents, fan blades, recessed lights, and paint or adhesive residue [7]. In neglected homes and homes with lots of pets, surfaces can get dusty again fast because trapped dust keeps circulating. Professional-grade tools can pull out more of that built-up dust [8].
A few signs usually make the call pretty clear:
- Dust comes back fast after cleaning
- You can see buildup around vents
- Someone in the home still has allergy symptoms even with regular cleaning
When that starts happening, deep cleaning isn’t just a nice extra. It’s the next step.
Conclusion
Lowering airborne dust is mostly about consistency, not one marathon cleaning day. The job is pretty simple: remove dust from the places where it collects – rugs, bedding, vents, fans, hard floors, trim, and soft furnishings – before it gets kicked back into the air you breathe.
The biggest wins usually come from regular HEPA vacuuming, hot-water laundry, damp dusting, and damp-mopping. Do those on a steady schedule, and you’ll get better results than you would from occasional deep cleaning.
A short routine that you can stick with does more than an all-out reset once in a while. Keep at it, and airborne dust stays lower.
FAQs
What if I don’t have a HEPA vacuum?
If you don’t have a HEPA vacuum, a standard vacuum can blow fine dust back into the air instead of holding it in.
A simple fix? Use damp microfiber cloths instead of dry dusters. They pick up dust better and help keep it from floating around. It also helps to clean slowly, since rushing can stir dust up fast.
If anyone in your home is sensitive to dust, have them leave the room while you clean.
And if dust buildup keeps getting out of hand, NLZ Cleaning Long Island offers professional deep cleaning with industry-standard equipment.
How long does dust stay in the air?
Dust can hang in the air for hours, especially tiny particles pushed around by airflow from HVAC vents and returns.
How fast it shows up again depends on a few things: your home’s dust load, pets, airflow, and whether your HVAC filter and fan runtime are doing enough to pull particles out of the air. That’s why cleaning can feel short-lived. The source is still there, and air movement keeps putting dust back on your surfaces.
Why is damp cleaning better than dry dusting?
Damp cleaning works better because it picks up dust the moment it touches the surface, instead of sending it back into the air. Dry dusting with a feather duster or a dry rag often does the opposite. It stirs particles up, lets them float around the room, and then they settle right back down.
A damp microfiber cloth makes this job much easier. The fibers hold dust in the cloth’s weave instead of spreading it around. To get the best result, rinse and re-dampen the cloth often, and work from top to bottom so dust doesn’t fall onto spots you already cleaned.