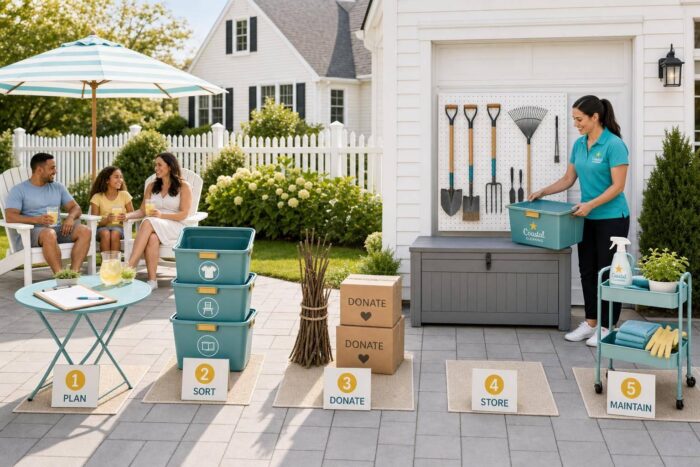
If I want my yard to feel clean fast, I start by sorting every outdoor area into 5 piles: keep, donate/sell, recycle/yard waste, move indoors, and trash. That one step cuts down wasted time and stops me from moving the same stuff over and over.
In this guide, I focus on the parts of outdoor cleanup that matter most in summer: patios, decks, porches, grill areas, walkways, sheds, tools, toys, storage boxes, chemicals, yard waste, and pest-prone clutter. I also keep Nassau County conditions in mind, since salt air, humidity, and pollen can wear down furniture, tools, and storage faster.
Here’s the short version:
- Walk the whole property first before touching anything
- Map each zone: patio, deck, porch, shed, side yard, garage wall, and paths
- Remove broken, rusty, or unused items first
- Clear the main living areas before the shed
- Use dry, weather-resistant storage for anything you keep
- Dispose of metal, yard waste, and chemicals the right way
- Cut fire and pest risks by removing leaves, standing water, cardboard, and rotting wood
- Stick to a weekly reset and monthly check
A lot of outdoor clutter comes down to a small number of trouble spots. In many homes, it piles up in garage corners, under decks, and along side yards. And once summer hosting starts, those piles get harder to ignore.
What I like about this approach is that it stays simple: assess, sort, clear, store, and maintain. That gives me a yard that looks better, feels safer, and takes less work to keep in shape through the rest of the season.
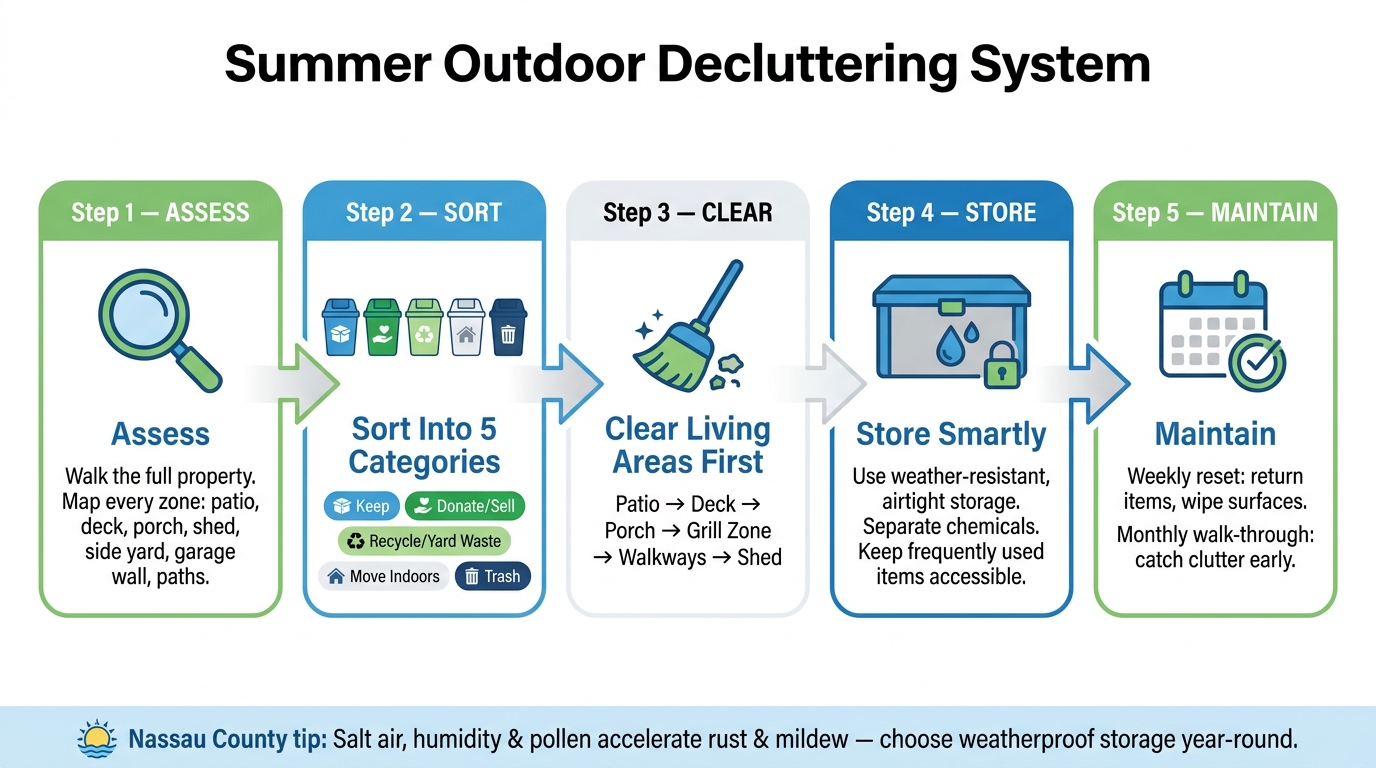
Summer Outdoor Decluttering System: 5-Step Process
SUMMER BACK PORCH RESET | Clean, Declutter & Decorate With Me
sbb-itb-a8bcf38
Plan the Project Before Moving Anything
Before you move a single item, map out each outdoor zone and note what’s there. That means the patio, deck, porch, yard, shed, garage wall, and any side storage.
Walk the property and look for the places where stuff tends to collect. In most homes, that’s the garage corners, the area under the deck, and the side yard. Flag broken furniture, rusty tools, and anything you haven’t used in the past year. Those are the first things to remove.
Also, count and measure what you plan to keep in each zone before you start shopping for storage. That way, you’re not guessing about sizes later [3]. Once the zones are mapped, sorting gets faster and a lot easier.
Walk the Yard and Assess Each Zone
As you go, ask two simple questions for every area: How will you use this space? and What should this zone look like next summer?
Those two questions help cut through the clutter. You’ll spot pretty fast what belongs, what’s in the way, and what has just been sitting there. Again, flag broken furniture, rusty tools, and anything that hasn’t been used in the past year. Those are your first removal picks.
Use Five Sort Categories for Outdoor Items
Give every item one clear destination:
- Keep
- Donate or Sell
- Recycle or Yard Waste
- Move Indoors
- Trash
Set up labeled bins, tarps, or marked areas near each zone as you work. That keeps you from handling the same item twice. Keep something only if you used it this year, it still works, or it belongs in that space.
Set a Realistic Weekend Timeline and Supply List
Block off one weekend and work one zone at a time. Finish one area before jumping to the next. That keeps the job from turning into a half-done mess spread across the whole yard.
For supplies, keep it simple: heavy-duty trash bags, work gloves, totes or boxes, and labels. Hold off on buying deck boxes, wall hooks, or other outdoor-rated storage until you know what’s staying.
With the plan set, move next to the patio, deck, and porch.
Declutter Outdoor Living Areas First
Start with the spots you use the most: the patio, deck, porch, grill station, and main walkways. Tackle the areas that shape day-to-day use and hosting first. When you clear the high-traffic zones early, it also becomes much easier to see what should go into storage.
Clear and Reset the Patio, Deck, and Porch
Remove everything from the surface first. Take all furniture, planters, décor, and loose items off the area. Once the space is empty, sweep and wash the patio or deck floor, scrub away mildew spots, and wipe down the furniture.
As you go, look at each item for what it is now, not what you hope it could be. Wobbly chairs, flat cushions, cracked frames, and anything showing rust from salt air and humidity should stay out. If fixing it would cost more than replacing it, discard it. Put back only the pieces you use and that fit the space, not every single thing that used to sit there.
Once the main surfaces are clear, shift to the grill and dining setup.
Simplify the Grill and Outdoor Dining Zone
Empty the grill-side storage, side tables, and serving surfaces all the way. Check every tool. Rusted utensils, bent brushes, and cracked accessories are not safe for food use and should be discarded. Donate duplicates you do not use.
Keep only the items that help with cooking, serving, and cleanup. That way, the area works well during cookouts instead of feeling cluttered and chaotic.
After that, open up the paths and entry points.
Keep Paths, Entry Points, and Seating Areas Open
Walkways and entry points fill up fast with shoes, packages, and toys. Remove anything blocking a path or doorway. In seating areas, cut back unused planters, dead plants, and faded décor that eats up floor space. The aim is safe, open movement through the area.
Next, move to sheds, tools, toys, and weatherproof storage.
Organize Sheds, Tools, Toys, and Weatherproof Storage
Next, deal with the hidden storage spots where clutter loves to pile up: the shed, the garage wall, and any outdoor storage area you’ve been putting off.
Empty and Zone the Shed or Garage Wall by Function
Take everything out first. Pull every item onto the driveway or lawn so you can see the whole inventory at once. Then sort it into the same five piles: keep, donate, recycle, trash, move indoors.
Once you see what you have, set the space back up by function. Hang long-handled rakes, shovels, and other gear on hooks or racks so they stay off the floor. Store lawn equipment in a dry, ventilated area. Keep sharp or hazardous items locked up or placed high. Put small accessories in labeled clear bins so you can spot what you need without digging around.
Only keep seasonal gear that still works and actually fits the space. After the area is cleared out, split items into two groups: what needs safe storage and what needs to go.
Store Equipment, Toys, and Chemicals Safely
Store lawn chemicals on their own. Keep fertilizers, pesticides, and herbicides in their original labeled containers – never pour them into unmarked bottles. Check expiration dates on a regular basis, and bring expired products to Nassau County hazardous-waste collection. [1]
For lawn equipment, the main goal is dry, ventilated storage. Moisture can speed up rust on blades and engine parts. Kids’ toys and sports gear do well in deck boxes or labeled bins. Keep often-used items, like bikes and pool supplies, in the easiest spots to reach and return. Hang anything that needs to dry, such as life jackets or paddles.
Then pair each item with storage that can deal with moisture and constant use.
Choose Storage That Holds Up in Nassau County Conditions

Long Island‘s coastal summers accelerate rust and mildew on outdoor storage. [2]
Use weather-resistant storage for cushions, toys, and loose accessories. Pick weatherproof deck boxes for items that may be exposed to moisture. For anything that doesn’t handle damp conditions well – grilling tools, outdoor tableware, or charcoal – use airtight bins with foam-sealed lids.
Dispose Responsibly, Prevent Pests, and Keep It Maintained
Donate, Recycle, Compost, or Trash Each Pile Correctly
Once you’ve sorted the patio, deck, porch, shed, and storage areas, the next job is simple: get each pile out the right way.
- Metal tools and old grills: Recycle them as scrap metal instead of sending them to a landfill
- Usable furniture: Donate it to charities or shelters if it’s clean and in good shape
- Clean plastic pots: Pass them along to schools or community gardens
- Safe toys: Donate them to shelters or daycares
- Yard waste and dead plants: Compost them or set them out for municipal pickup; skip anything diseased or infested with pests
- Broken ceramic or terracotta: Crush it and use it for drainage
- Garden chemicals: Take them to a Nassau County hazardous waste collection event – never pour them down a drain or toss them in regular trash [1]
After the piles are gone, take one more pass through the same spaces. Look for dry leaves, standing water, and anything else that could turn into a problem later.
Cut Fire Risks and Remove Pest Hiding Spots
After disposal, clear out anything left behind that can burn, hold water, or give pests a place to hide.
Dry leaves, old wooden furniture, and stacks of cardboard in sheds can catch fire fast during peak summer heat. Empty propane tanks need special handling too. Take them to a recycling or hazardous-waste facility, and never put them in regular trash. [1]
Clutter also gives pests an easy setup. Rodents nest in firewood stacked on the ground. Mosquitoes breed in any container with standing water. Termites move into rotting wood before you know it. Keep firewood on a covered rack off the soil so it stays dry. Drill drainage holes in containers that can collect rainwater. Cut shrubs and vines back from sheds and decks, since thick growth gives pests a straight path into those structures. [1]
Conclusion: A Simple System for a Clutter-Free Summer Yard
Once disposal is done, protect all that work with a simple weekly and monthly routine.
The system is pretty straightforward: assess by zone, sort into clear groups, clear the living areas first, set up storage that fits each space, and get rid of items the right way. When that base is set, upkeep gets much easier.
Do a weekly reset by putting things back where they belong and wiping down porches and patios. Then do a monthly walk-through to spot clutter before it builds up. A yard that works well doesn’t need constant work – just a simple system you stick with.
FAQs
What should I declutter first outdoors?
Start with your garage or shed. These spots usually hold the biggest seasonal items, so tackling them first makes the rest of the job a lot easier.
Once you empty them out, you can see what you have and sort it into clear piles:
- Keep
- Donate
- Recycle
- Dispose
There’s another upside too. Clearing out these storage areas gives you room to organize and store patio and yard items in a much neater way.
How do I store outdoor items in humid weather?
Use airtight bins or cabinets with foam-sealed lids to help keep moisture out. If you’re storing larger pieces, like cushions or outdoor accessories, go with water-resistant deck boxes that fit your gear without cramming everything in.
Some items just don’t hold up well outside. If they can’t be sealed or covered properly, move them to a garage, shed, or indoors to help prevent mold and mildew.
For longer-term storage, keep items in airtight containers to block humidity and pollen.
Where do I dispose of old yard chemicals?
Never pour old yard chemicals down drains or toss them in your household trash. They can be hazardous.
A better move is to contact your local waste management facility and ask how to get rid of them the right way. Many communities also run hazardous waste collection events a few times each year for products like these.
To keep extra products from piling up later, buy only what you need for the current season.